
Care

Care and operation of your new windows
This guide is designed to answer some of the most frequently asked questions about the care and operation of your new windows. We are confident that your new windows will provide a perfect fit for your home and your lifestyle.
Thank you for choosing SEVEN SUN.
Double-hung
Double-hung windows are designed to allow both sashes to raise, lower and tilt in for cleaning the outside surfaces of both the upper and lower sash.
To tilt in the lower sash, follow these steps:
- Unlock the window.
- Raise the lower sash a minimum of 3″.
- Pull both tilt latch buttons (located on the top rail of the sash) towards the center of the sash to disengage them from the mainframe jambs. (Photo 1)
- With both hands, carefully pull the top of the lower sash in toward you slightly beyond a 90-degree position. (Photo 2) Support the sash while cleaning the exterior. (Photo 3)
To tilt in the upper sash, follow these steps:
- Lower the upper sash to at least 2″ above the sash stops -located in the lower outside track. (Photo 4)
- Pull both tilt latch buttons toward the center of the sash to disengage them from the mainframe jambs. (Photo 5)
- With both hands, carefully pull the top of the upper sash in toward you slightly beyond a 90-degree position and rest it on top of the supported lower sash. The upper sash cannot be tilted in without the lower sash being tilted in. (Photo 6)
To replace the sashes to the operating positions, hold the top rail of the sash with both hands and push it all the way into mainframe tracks. Make certain that the tilt latch buttons click in to lock the sash in the mainframe.If the tilt latches are not reengaged in the mainframe, the sash may fall inward unexpectedly:
Note: To tilt both sashes in, tilt the lower sash in first, then tilt in the upper sash. To reengage the sashes, reposition the upper sash first, then the lower sash.

Photo 1

Photo 2

Photo 3

Photo 4

Photo 5

Photo 6
Sliding
Sliding windows are designed to roll from side to side in their own tracks. They are removable from these tracks for the cleaning of the exterior surfaces.
To remove the interior sash (right sash), follow these steps:
- Roll the right sash to within 3″ of the left side. This will enable the sash to bypass the burglar block located in the header of the mainframe. (Photo 1)
- Lift the sash up into the header of the mainframe as high as it will go.
- Pull the bottom of the sash toward you. This will clear the rollers and sash frame from the mainframe. (Photo 2)
- Lower the sash to the floor. (Photo 3)
To remove the exterior sash (left sash), follow these steps:
- Roll the left sash to within 3″ of the right side.
- Lift the sash into the header of the mainframe.
- Pull the bottom of the sash toward you, and lower it to the floor. (Photo 4)
To replace the sashes to the operating positions, hold the top rail of the sash with both hands and push it all the way into mainframe tracks. Make certain that the tilt latch buttons click in to lock the sash in the mainframe.If the tilt latches are not reengaged in the mainframe, the sash may fall inward unexpectedly:
Note: Carefully clean the exterior of the sashes. To replace the sashes, simply reverse this process.
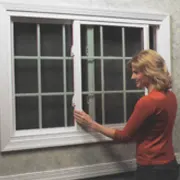
Photo 1
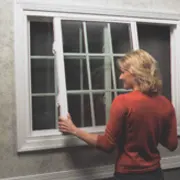
Photo 2
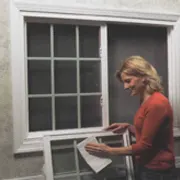
Photo 3
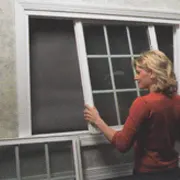
Photo 4
Casement
Just as with other window styles, casement windows are easily cleaned from the interior of the home.
To clean the casement window, follow these steps:
- Pull the screen pins.
- Remove the screen.
- Unlock the window. (Photo 1)
- Crank the sash to open position. (Photo 2 & Photo 3)
- Clean the interior side of the sash. (Photo 4)
- Crank the sash to fully open position and (Photo 5)
- Clean the exterior of the sash by reaching your arm through the space between the mainframe and the sash. (Photo 6)
- To reinstall the screen, place it into the opening and push the screen pins in to hold it in place.
Note: These instructions may not apply to egress models.

Photo 1

Photo 2

Photo 3

Photo 4

Photo 5

Photo 6
TO CLEAN TILT + TURN WINDOW FOLLOW THESE 2 SIMPLE STEPS:
- Turn the handle from regular position (Photo 1) to 90 degrees. (Photo 2)
- Swing the sash inward for cleaning (Photo 3)
Voila! Now, you can easily clean your window (Photo 4)
TILT + TURN
At first glance Tilt + Turn window may look similar to casement window. This may be misleading. Tilt + Turn windows are different than casement windows in regards to how they are built and how they open and close. But one of the biggest key features of a Tilt + Turn window is the fact that you can get all of the functions with a single action tilt + turn handle.

Photo 1

Photo 2

Photo 3

Photo 4
Care and cleaning
Windows
Label and tape adhesive should be removed by alcohol-based cleaners on small glass areas only. After this is removed, thoroughly wet the glass and rinse with plain water. Glass can be cleaned with regular or ammonia-based glass cleaners.
Vinyl (PVC) window frames can be cleaned with a solution of mild soap and water. For heavier cleaning tasks, the window manufacturer recommends commercially advertised household cleaners. Use non-abrasive cleaner. Do not use solvents and paint removers. We recommend using Spray Nine multi-purpose household cleaner.
Condensation is caused by excess interior relative humidity in the home. It is your responsibility to control your home’s relative humidity. For more information, request a copy of Your Guide to Common Household Condensation.
If mildew is a problem in your area, use an appropriate cleaner or mildew controller found in your local store.
Painting or varnishing your window is not required and will void the warranty.
The tracks of the double-hung and sliding windows are exposed to the outdoor elements, which can contain abrasive elements such as dirt, leaves, sand, grease, soot, etc. If these elements are not removed, they can be ground into the vinyl tracks when the sashes are operated. A minimum semi-annual cleaning is recommended. These tracks can be cleaned with a small, stiff nylon brush, and then wiped down with a soft cloth. If necessary, an occasional light coat of silicone spray lubricant on the balance shoe track of a double-hung, and the tracks of a sliding window, will help ease the operation without leaving an oily residue, which can collect more abrasive elements.
Follow the manufacturer’s recommendations for safe use of any chemical or cleaner. Any cleaning information suggested in this manual is only to assist you. The window manufacturer assumes no responsibility for results obtained which are dependent on the chemical solutions as prepared, and quantity and method of application.
Screens
Screens can be cleaned easily with a soft brush accessory from a vacuum cleaner. If a more thorough cleaning is desired and the screens need to be removed, follow these steps:
Double-hung
- From can interior, raise both sashes to their highest position.
- Raise the screen up to a point where you can get your hand on the lower aluminum frame section.
- Push the screen to the left side of the window. The screen has springs on this side.
- Once the screen is positioned as far as possible, gently push the right side of the screen toward the exterior.
- Once the right side is disengaged from the screen track, remove it from the left side as well.
To replace the screen to its tracks, follow these steps:
- The springs should be positioned on the left. Place the springs in the left screen track.
- Push the screen as far as possible.
- Pull the right side in, center it in the right screen track, and reengage it in that track.
Sliding
To remove a screen on a sliding window, simply pull up on the aluminum screen track bottom, placing it all the way up into the top screen track. Push out the bottom to clear the screen from the bottom screen track, and disengage the screen at the top.
To replace the screen, reverse the above steps.
DOs and DON’Ts
Do:
- Open the top and bottom sash for improved ventilation.
- Use both hands to support sashes while tilting them in to clean.
- Support the sashes when they are in the cleaning position.
- Make sure the tilt latches are fully engaged after tilting sashes back into the operating position.
- Make sure the top sash on a double-hung window is closed and up all the way before locking the window.
Don’t:
- Leave the lock in the locked position when closing the window, this will damage the keeper.
- Attempt to remove the sashes on double-hung windows.
- Use oil base spray lubricants such as WD 40, they attract dirt. Do use a silicone spray for lubrication.
- Attempt to move a Swing & Clean sliding window sash when the pivot hardware is locked.
- Use abrasive-type cleaners to clean the glass or vinyl on these windows.
- Use solvents to clean the windows.
- Use the crank on a casement window without unlocking the window first.
- Use a high pressure hose to clean the outside of a window.
- Install an air conditioner in a vinyl window without adequate support.
- Paint or varnish vinyl windows – this will void the warranty.
Warranty Label
The warranty label on your window will provide all the pertinent information about your windows for years to come. The label should be left on the window frame for possible future reference.
The label includes the following information:

The warranty label number references an Alside database containing all window and component information should your window need warranty service. Do not remove this label.
Where can I find the label?
In a double-hung window, you can find the warranty label on either the top of the upper sash or under the header of the mainframe. In a sliding window, you can find the warranty label on the top of the one of the sashes or under the header of the mainframe.